Wednesday, March 17, 2010

How do I create a Blogger Feed? Print

Feedburner.com gives you option to customize the feed for your blog, and you can give visitors to subscribe via email and also track visitors and how many people had subscribed to your feed. It also give lot of customization options. Here I will explain how you can use feed burner for providing email subscription option to your blog.

...Start...
Click here to go to Feedburner. There on the Feed-burner homepage, Enter your full blog address such as http://bloggerhelped.blogspot.com/ in the “Ready to Burn?” form. Click Next

Identify Feed Source

If your Blog provides both RSS 2.0 and Atom 0.3 feeds, then you can select one of the options here. You might see choices such as

http://bloggerhelped.blogspot.com/feeds/posts/default

My suggestion, choose the RSS 2.0 feed which could be yoursite.com/feed

Give your feed its title and feedburner.com address

On “Welcome”, make sure the title and FeedBurner address (URI) of your new feed are values you prefer.

create a FeedBurner account by picking a username and password and supplying your email address.
click Activate Feed ». A "Congrats" page should appear.
then click Next » to continue with the setup process.

Tuesday, March 16, 2010

How do I install ERD Commander 2000?

Winternals Software has released a new version of its Em
erg ency Repair Disk (ERD) software. This new version, ERD Commander 2000, has many great features and great new ways to deploy the utility.

The previous version, ERD Commander Pro, created a set of

Windows NT start up disks; however, ERD Commander 2000 lets you create boot disks or a bootable CD-ROM or install ERD Commander 2000 to the local hard disk (like the Windows 2000 Recovery Console--RC).

To install the new version of the software, simply perform the following steps:

  1. Go to the directory to which you downloaded ERD Commander 2000.
  2. Double-click e2ksetup.exe.
  3. Click Next.
  4. After reading the license agreement, click Yes.
  5. Specify a destination folder and click Next (by default, the destination folder is C:\program files\Winternals\ERD Commander 2000).
  6. Click Next to the program folder name, then click Next again.
  7. The system will copy files and registry entries, and the Setup Wizard will start.
  8. Click Next when the license agreement appears again.
  9. Select the type of installation, and click Next.
  10. The system will ask for the location of the i386 folder of a Win2K installation (Professional or Server). Specify the appropriate location, and click Next.
  11. If you have any special SCSI drivers, the system gives you the chance to add them; after you do so, click Next.
  12. You can now set a password to access the installation. Set a password (this step is very important if you've chosen to install ERD Commander 2000 on the local hard disk, but it is also an option if you are creating a bootable CD-ROM), and click Next.
  13. Click Next to create the disks/files.
  14. Click Finish.

If you selected to create a bootable CD-ROM, you need to perform a few more steps. You will have a folder with the following items in it:

  • i386 folder (contains the files used for the console)
  • BOOTSECT.BIN (the file you will use as the boot sector for the CD-ROM)
  • cdrom_is.5 (for Win2K Server) or cdrom_ip.5 (for Win2K Pro)

To create the CD-ROM, start your CD-ROM burner software, and specify the following settings:

  • Use ISO 9660 file system (Not Joliet)
  • Include Hidden files
  • Include System files
  • Disable Version Numbers
  • Set as bootable CD_ROM
  • Set boot sector image to BOOTSECT.BIN
  • Set Media Emulation to Custom
  • Set Load Sector Count to 4
  • Set Load Segment to 07C0 (hex)
If you were using Golden Hawk CDRWIN software, your main screen would look like the one shown in Figure 1, and you would click Advanced Options to set the bootable parts.

Click here to view image

One really neat feature of the new version is that it takes only two steps to change a password.

  1. Use the following command to connect to the registry:

    C:\> registry

  2. Use the password command to change the password:

    C:\> password [username] [new password]

I highly recommend this new version. The old version saved my neck a number of times, and this new version is even better. You can purchase ERD Commander 2000 for $349. An upgrade to ERD Commander Pro is available for $49. ERD Commander 2000 operates on both NT 4.0 and Win2K. For more information, visit the Winternals Software Web site.


Monday, March 8, 2010

How to Add "Read More..."Posts link in Blogger

1. Login to your Blogger account and go to Layout > Edit HTML (click Expand Widget Template).

2. Find this line of code:

<data:post.body/>

3. Copy this code just before the code above:

<b:if cond='data:blog.pageType == "item"'>
<style>.fullpost{display:inline;}</style>
<p><data:post.body/></p>
<b:else/>
<style>.fullpost{display:none;}</style>


4. Now, copy this code just after the code above <data:post.body/>

<b:if cond='data:blog.pageType != "item"'><br />
<a expr:href='data:post.url'>Read more...</a>
</b:if>
</b:if>

Change the Read more... text to whatever link text you want to appear. The result should look something like this now:
5. Save your template.

Adding Class Tag in Your Default Post Template:
1. In your Blogger Dashboard, go to Settings > Formatting and scroll all the way down to the bottom. Copy this code and then save settings:

<span class="fullpost">

</span>


It should look something like this:

Creating a New Post:

When you click the Posting tab (HTML mode), you'll notice that your default post template now has <span class="fullpost"> and </span> tags. Anything you put above the tag <span class="fullpost"> will be the teaser text. The main body of your post needs to go in between the <span class="fullpost"> and </span> tags in order for the “read more…” link to work properly. See image below:


Publish or preview your new post to see your newly created "Read More..." works on your blog.

Friday, March 5, 2010

Insert HTML Code to Blogger Posting

If you enter any Java Script or HTML code in your posts, Blogger will automatically execute that code considering it a regular part of your post. We just need to encode our HTML special characters like <, >, & into entities <, >, &. This is a really painful process but Beta Templates is here to help you.
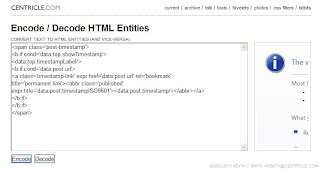
But how if the code is to much??? You can use this site to help change characteristic into notation. (http://centricle.com/tools/html-entities/). The way is so simple. Put your code and then click uncode.


Click The Encode Button Than it look like the Below Image.
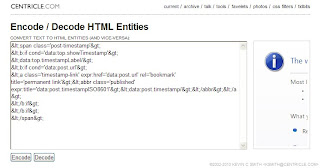
Post the Html code in the Post area,and Publish Post


Hide Post Date, Time and/or Author

There are some reason for blogger to hide Post date, time and author. May be they want to see their blog looks clear or everything? Now I will show you the trick to "hide your post date, time and or author". The methods are very simple, just find the code that I pointed to you and delete it. You can chose which part want to delete, date only, time only, author only or it all. Ok, if you decided to do it lets begin the hack.

1. Login to blogger the go to "Layout --> Edit HTML"
2. Click on the "Download Full Template" to back up your template first.
3. Check on the "Expand Widget Templates" check box.


Hide Post Date

find this code and delete it.

<data:post.dateHeader/>

Hide Post Time


find this code and delete it.


<span class='post-timestamp'>
<b:if cond='data:top.showTimestamp'>
<data:top.timestampLabel/>
<b:if cond='data:post.url'>
<a class='timestamp-link' expr:href='data:post.url' rel='bookmark'
title='permanent link'><abbr class='published'
expr:title='data:post.timestampISO8601'><data:post.timestamp/></abbr></a>
</b:if>
</b:if>
</span>

Hide Post Author


find this code and delete it.


<span class='post-author vcard'>
<b: if cond='data:top.showAuthor'>
<data:top.authorLabel/>
<span class='fn'><data:post.author/></span>
</b:if>
</span>


Save your editing