Thursday, January 23, 2014

Create a Online Signature(Digital Signature) for your blog/website post.

Dear all,I am here to share with you my thoughts and the thought is to publish your Blog/Website Post with your Signature,follow the instruction to create your online signature and upload it with your post.

1). To create a Signature click here MyLiveSignarture.a window will open just registered here and log-in with your ID,if you do not want to register directly click on proceed button without register see the picture below.

Thursday, February 23, 2012

Add a Gadget Header into Page Element for Blogger.

Add a additional header Gadget into page element so that the blogger owner can add any other article,picture etc under the header.

Just see the picture below how looks default Header Gadget.


Now we can start how to add extra Header Gadget.

Note: Before Edit your Template take your Template full Backup.

Note: Never forget to click on Expand Widget Template tag before Edit or backup your Full Template

1. First Sign-in to your Blogger click on Design under the Design Tab you will see Edit HTML click on it see below. 


2. Find the Below Code ( By preshing Ctrl+F ) Put the code inside the serch box than Enter see picture below.

showaddelement


3. The code will be look like see below.

 <div id='header-wrapper'>
      <b:section class='header' id='header' maxwidgets='1' showaddelement='no'>
<b:widget id='Header1' locked='false' title='Blogger Help (Header)' type='Header'>
<b:includable id='title'>

4. Just change here these two things.

(showaddelement='no')  to (showaddelement='yes')

maxwidgets='1') to (maxwidgets='2') 

5. Than click on Save Template,go to the Page Element i am sure you will get extra Header Gadget there see Picture also below.


You have done

Thanks For coming here.

Thursday, December 22, 2011

Take Full Backup of Blogger Template.

Do you know why i suggest you all to take the backup in regular basis this is why,if you are running a blogger and you are getting good revenue from your blogger so please don't think that your are the owner of this blogger google is the owner google is controlling our blogger's all activity.I had read over the internet about several cases where are blogger's blog has simply disappeared and Google never explain about it or get it back.in many cases google also block for policy violations  and also many hackers are ready to heck for escaping to hack your blogger take backup regularly.

Take the backup of your Blogger:

1. Sign in to your blogger you will see a dashboard see picture below.


2. Click on Design than Edit HTML now check the Expand Widget Template see picture below.


Note: Never forget to click on Expand Widget Template tag before Edit or backup your Full Template 

3. Now Click at the Download Full Template ,there will be a small window will appear at your screen which will ask to save your Template location give the path where you want to save your Template backup see picture below.


You have done

Thanks For coming here.

Tuesday, December 20, 2011

Add StumbleUpon Badge to your Blogger

StumbleUpon is a directory this is a collection of different types Website/Blogger you can share your Website/Blooger with thousand of Peoples all around the world.

See How to put the Badge of StembleUpon to your Blogger.

1. Login to Your StembleUpon than you will see a sites button at the right side click the button see picture also.


2. As you click Sites button next window will open there you can select any badge Design copy the code from the box see picture below


Put your code inside your Template follow me how.

1. First Sign-in to your Blogger click on Design under the Design Tab you will see Edit HTML click on it. 

Note: Before Edit your Template take your Template full Backup.

Note: Never forget to click on Expand Widget Template tag before Edit or backup your Full Template


Find the Below Code ( By preshin Ctrl+F ) Put the code inside the serch box than Enter.

<data:post.body/>

Paste the code under the above (Red Color code) code which will look like see below.

<data:post.body/>
<!-- Place this tag where you want the su badge to render -->
<su:badge layout="3"></su:badge>

<!-- Place this snippet wherever appropriate -->
 <script type="text/javascript">
 (function() {
     var li = document.createElement('script'); li.type = 'text/javascript'; li.async = true;
      li.src = 'https://platform.stumbleupon.com/1/widgets.js';
      var s = document.getElementsByTagName('script')[0]; s.parentNode.insertBefore(li, s);
 })();
 </script>

Save your Template browse your Blogger to see the StumbleUpon Badge

Thanks For coming here.

Monday, December 19, 2011

Add the Official Share Buttons to Blogger/Website

Blogger allow to add the share button like Twitter,Facebook,Google Buzz,Gmail so that the viewers can share and add your website/Blogger.


Just Learn to Add Share Button

1. Add Share Button below your blogger post Log-in to your Blogger Click on Design than Page Elements see Picture also.


2. Now under the Page Elements you will see many Add Gadget do not click any Gadget Just look for Blog Posts (which may be placed at the middle portion) Click on Edit button see Picture also below.


3. Than Select the Check Button of Show Share Buttons and Shave your Template.

Done.

Note: After Doing all above step just check your blogger to view if the share button do not appear over your blogger just follow me a little more.

1. Log-in to your Blogger Click on Design under the Design Tag click on Edit HTML now click on chek button Expand Widget Template.

Note: Before Edit your Template take your Template full Backup.

Note: Never forget to click on Expand Widget Template tag before Edit or backup your Full Template

2. Now find the code see below.

<data:post.body/>

3. Place the code under the above code and save your Template i am sure you will see the share button now.

    <data:post.body/>
<div class='post-share-buttons'>
<b:include data='post' name='shareButtons'/>
</div>
  

4. Paste the code under the green code.


Thanks For coming here.

Saturday, December 17, 2011

Take the backup of your blogger's all post

This is for your safe purpose if by mistake or any reason your post goes deleted and there are no option you have so just learn how to take your all posted backup in your computer regularly and restore your post in case your post deleted and you can also transfer your post to another blogger easly with your post backup.


Step to take backup your post:


1. Log in your blogger.

2. Click on the Setting and than click on Basic tab.


3. There you will see the three Blog Tools :Import blog - Export blog - Delete blog.

4. Select the Export blog tag for taking backup of your all post. 


5. After Clicking Export blog tag you will get next page to Download blog.
 
6. Choose the location where you want to take backup of your blogger with post.


Thanks For coming here


Wednesday, December 14, 2011

Create Google+ Page for Your Blogger/Website

Google+ is a great source for promote your Website/Blog just create and place your Google+ Page on your Blogs.


Start to create Google+ button :


1. Log-in to Google+


2. After Log-in see at the Right side in the botton of your Google+,see below and Just click on Create a Google+ page Icon 


  .


3. Pick a Category Product or Brand.


4. Fill all the information Like Website Title and URL of your Website/Blog.

5. Select I agree to the page term.

6. Push the Create Button now.

7. Just give the tagline upto 10 words which will describe your Website/Blogger.

8. Photo can be upload as per your choice.

9. Click Continue.

10. Share as per you required.

11.Finish.


Post the code at your Website/Blogger Page.

Thank You

Monday, March 14, 2011

Highlight Author Comment in Blogspot

highlight the author comments in blogger

Be Alert : Before doing anything keep remember to take full backup of your template.

Login to your Dashboard > Layout > Edit Html.

Click Expand Widget Templates Check Box.

Copy and paste the code below before the closing ]]></b:skin>

.comment-body-author {
background: #ffffff;
border: 2px solid #666666;
padding: 5px;
}

Change the line
background: #ffffff;
with
background: url(http://DIRECT_LINK_OF_THE_IMAGE.jpg) ;

If you want to show any background image in place of white color.

Next, search for the following lines of code.

<dl id='comments-block'>
<b:loop values='data:post.comments' var='comment'>
<dt class='comment-author' expr:id='"comment-" + data:comment.id'>
<a expr:name='"comment-" + data:comment.id'/>
<b:if cond='data:comment.authorUrl'>
<a expr:href='data:comment.authorUrl' rel='nofollow'><data:comment.author/></a>
<b:else/>
<data:comment.author/>
</b:if>
<data:commentPostedByMsg/>
</dt>


<b:if cond='data:comment.author == data:post.author'>
<dd class='comment-body-author'>
<p><data:comment.body/></p>
</dd>
<b:else/> 


<dd class='comment-body'>
<b:if cond='data:comment.isDeleted'>
<span class='deleted-comment'><data:comment.body/></span>
<b:else/>
<p><data:comment.body/></p>
</b:if>
</dd>


</b:if>

<dd class='comment-footer'>
<span class='comment-timestamp'>
<a expr:href='"#comment-" + data:
comment.id' title='comment permalink'>
<data:comment.timestamp/>
</a>
<b:include data='comment' name='commentDeleteIcon'/>
</span>
</dd>
</b:loop>
</dl>

You have to add Red codes in your html in the way i have shown above between the codes.I hope you will be able to do it.


Wednesday, March 9, 2011

Adsense Ads Only on Home page or Post pages of Blogger/ WordPress blog

you can show different ads on homepage and post pages on your Blogger or  WordPress blogs. All you have to do is use the conditional tags with the ad code. You may use a conditional tag to show ads only on homepage and another conditional tag to show ads only on post pages. In this way, you can show different ads on homepage and blog post pages.

When you place ads to your Blogger or WordPress blog they appear on Home page, Post Pages and other pages. Some of you want to show the ads only on Home page or Posts pages.


Loging In your Blogger select Dashboard ---> Design ---> Edit HTML ---> Select Expend Widget Template :

Note : Before doing anything take the backup of your template by click on Download Full Template.


Show ads on Home Page only

Find These ads line in  HTML Code

Change your ad code as follows

<b:if cond='data:blog.pageType != &quot;item&quot;'> YOUR AD CODE </b:if>

Show ads on Individual Posts Page only

Change your ad code as follows

<b:if cond='data:blog.pageType == &quot;item&quot;'> YOUR AD CODE </b:if>

Show Adsense/other Ads Only on Home page or Post pages of WordPress blog

Show ads on Home Page only

Change your ad code as follows

<?php if (is_home()) { ?>
YOUR AD CODE
<?php } ?>
Show ads on Individual Posts Page only

Change your ad code as follows

<?php if (is_single()) { ?>
YOUR AD CODE
<?php } ?>
That is it Thank you

Monday, February 21, 2011

Submit Your Blogs Sitemap To Google


Generally speaking, sitemap is simply a website-map, showing all the pages and sub-pages of a website or a blog, which guides both visitors and search engines like Google, Yahoo etc. to roam around your blog. And when search engines roam around your blog, it is called indexing of your website. And as "indexing" is one of the most important aspects of SEO, so submission of sitemaps to Google/Yahoo/Bing is very very important.

Tuesday, February 15, 2011

How to center post title

If you want to center (or align left or align right) the post title, sign into Dashboard > DESIGN > EDIT HTML to open the template editor and search for .post h3 (use ctrl+F) or code that may look something like those below (code below for Minima template, yours may be slightly different):

Reminder: Always backup template and backup gadgets before editing the template.

.post h3 {
margin:.25em 0 0;
padding:0 0 4px;
font-size:140%;
font-weight:normal;
line-height:1.4em;
color:$titlecolor;
}

The just add this line text-align:center;
.post h3 {
text-align:center;
margin:.25em 0 0;
padding:0 0 4px;
font-size:140%;
font-weight:normal;
line-height:1.4em;
color:$titlecolor;


preview and if OK, save template.

Update: Different template may define post title differently. For example, a commentator found that for her, it was 
h3.post-title {

If you want to align the post title to the left or to the right, just substitute text-align:center; with eithertext-align:left; or text-align:right;


Monday, January 24, 2011

How to reset corrupted Blogger Blog Posts template

So you finally did it! You’ve managed to tweak your Blog post gadget template to the point where it is starting to behave or function strangely. Now the most important and complex part of your blog is all messed up -the date stamp is missing, the post footer disappeared, the comments section looks weird, the comment link  is nowhere to be found etc.

Tuesday, March 23, 2010

Submit blogger sitemap to yahoo

submit your blogger sitemap to Yahoo.By submitting your sitemap to yahoo, they will index your web pages in yahoo search engine and provide you with detailed information related to your blog like which pages are linking to yours,popular pages in your site and you can submit and track feeds for your sites. Also,you have the choice to delete any URL of your blog if you won't want to index certain pages of your site. Submitting your site to yahoo is easy and give your web pages more exposure.
All you need is a YAHOO ACCOUNT(ID).However,you don't need an yahoo ID to know the information like how many pages are indexed,etc.But,if your blog is a new one or no pages in your blog are indexed(type your blog URL in yahoo search and see to check whether your web pages are indexed or not), then you want Yahoo id to submit your sites,feeds,etc.

  • Click on the 'Sign in' link which is at the top of the page,see the screenshot below(If you don't have a Yahoo id, you can get one here) and sign into your account.
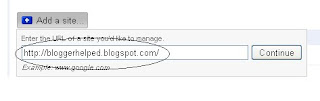
  • Type your blog URL in the box provided as shown in the below screenshot.Don't forget to replace the 'yourblogurl' with the original URL of your blog and click on the 'Add My Site'

After adding your site,you need to Authenticate(Verify your ownership).


There are two ways to verify your ownership.One is to upload a file to the root directory of your site which can't be possible in blogger.Another one is to 'adding a meta tag' which is possible and the only way to verify ownership for blogger.First,copy the meta tag..


Next,sign in to your blogger account>Edit html and paste the metatag below the head tag and SAVE THE CHANGES,look at the screenshot below. 

                                        
Next,you will get a message saying that 'Your site is pending authentication'

Note:Don't remove the meta tag,they will re validate your ownership by checking your ownership regularly.
Next,go back to the 'Site explorer home', and check the box next to your blog URL and click on the Manage button.    

 
Type rss.XML or atom.xml in the box provided.It helps yahoo to discover more of your site content via your rss or atom feeds and to index your blog pages quickly whenever your blog is updated.Next,click on the add feed button.


That's it.Now,you have sucessfully submitted your blog sitemap to yahoo.Check your account after a couple of days and you will see your blog indexed in yahoo search engine.

Friday, March 19, 2010

How To Create And Add Google Sitemap For Blogger Blogspot

Login to Google Webmaster Tools with your Google Account (Gmail)


Click ‘Add a site…’ button


Enter your blog’s URL address


Copy the 'Meta Tag' / 'Meta Name' code


Login to Blogger.com, go to ‘Layout’ –> Click ‘Edit Html’ and paste the Meta Tag as shown in the image below


Save Template
When you’re done, go back to Google Webmaster Tools and click the ‘Verify’ button.


Submit Sitemap

Copy this code – http://yourblog.blogspot.com/atom.xml?redirect=false&start-index=1&max-results=500

Go to ‘Site Configuration’ –> ‘Sitemaps’ –> ‘Submit a Sitemap’. Paste atom.xml?redirect=false&start-index=1&max-results=500     into the text box and click ’submit’


You should be seeing something like the screenshot above in your Webmaster Tools account, depending on the number of articles you have.

 Note :


If you have more than 500 articles, you will need to submit additional sitemap for the URL only index the first 500 articles. Example:
Article 1 to 500 – atom.xml?redirect=false&start-index=1&max-results=500
Article 501 to 1000 – atom.xml?redirect=false&start-index=501&max-results=500
Article 1001 to 1500 – atom.xml?redirect=false&start-index=1001&max-results=500
Article 1501 to 2000 – atom.xml?redirect=false&start-index=1501&max-results=500
Article 2001 to 2500 – atom.xml?redirect=false&start-index=2001&max-results=500

Thursday, March 18, 2010

How to Set Up Google Webmaster Tools on your blogger

Adding Google Webmaster Tools is just as essential as adding Google Analytics. The 2 go hand in hand. With Webmaster Tools you can do a variety of things such as:

1)Submit an XML Sitemap
2)Set Crawler Access
3)See internal site links
4)See Top Search Queries
5)See keywords that earned a clickthrough
6)See external links to your site (backlinks)
7)View site errors in including crawl errors

Get an account with Google (its free) or use an existing one. Then go to the Google Webmaster Tools home page: www.google.com/webmasters/tools Log in and click the add a site button. Type in the URL of your website and click add.


Once you have clicked add your site you will be taken to a Verification Screen with a Meta Tag you will need to insert into the code of your blogger.

Alright, now we need to open a new window and navigate over to our Edit HTML section of our blog. (DO NOT CLOSE THE PREVIOUS WINDOW, OPEN A NEW ONE. Yes, you can get back to it, but just leave it open for this tutorial 
1) Go to http://www.blogger.com/
2) Sign-in and go to your blogs control panel.
3) Click on "Template" (Callout 1 in the graphic below)
4) Then click "Edit HTML" (Callout 2 in the graphic below)
 
Now that we have both our verification code saved from before, and we are in the blogger "Edit HTML" section of the blog we wish to get more information on, we can place the verification code.
1) Find the "" tag in your template. (Callout 1 from the graphic below)
2) Place the code you copied from Webmaster Tools directly below the tag. (Callout 2 from the graphic below)
3) Scroll to the bottom of the page and click "Save Template"
 
Now with the Verification code properly placed and saved we can complete the verification process.

Go back to the Webmaster Tools window (you left it open right?) and click the verify button as noted in the graphic below.


Wednesday, March 17, 2010

Purchase Domain Through Blogger

many of us using blogger blogspot blog for blogging, because it is easy to use and editable.but after a while you want to your blog look more professional and more credible by Publish on a custom domain .because some people think that yourblogname.blogspot.com used by newbies only, That’s not always true, of course.
there is 2 ways to do it,

1- Point your already owned and registered domain name to your blog.
2- buy new domain name via your blogger account.

we’ll now talk about number 2.
buy new domain name via your blogger account.now blogger makes it easier to convert your Blogspot Account Into A .com Domain when you register a domain name via blogger account your Domain will be registered through a Google partner and cost $10 (USD) for one year.and as part of registration, you will also get a Google Apps account for your new domain.and the great deal here is that YourBlogName.blogspot.com will redirect to your new custom domain. so you won’t leave your readers behind!the first thing to to is to log into your blogger account,

Then got to Settings >> Publishing
FIND : Switch to: • Custom Domain
and click Custom Domain
for more detail check next image


FIND : What address would you like your blog to have? next to this you’ll find a small text filed, fill it by your custom domain name, and click Check Availability


If it is Available you will navigate to Choose a domain name (step 1 of 3) pageclick continue to registration after that you’ll navigate to Sign up (step 2 of 3) page.Enter the domain registration information for your chosen domain name.and note that this information will be listed in whois directory.then click i accept, process to Google checkout.if you already have credit card added to your Google account, you can easily press agree and continue Or you have to add your billing information, credit card number and details to your current Google account.once you are finished press agree and continue.next review your purchase and press place your order now.now your custom domain is setup.you are finish, please note that it may take 2 for 3 days to your blog to transformation to your new domain.finally here is video helps you to do it in the right way.

How do I create a Blogger Feed? Print

Feedburner.com gives you option to customize the feed for your blog, and you can give visitors to subscribe via email and also track visitors and how many people had subscribed to your feed. It also give lot of customization options. Here I will explain how you can use feed burner for providing email subscription option to your blog.

...Start...
Click here to go to Feedburner. There on the Feed-burner homepage, Enter your full blog address such as http://bloggerhelped.blogspot.com/ in the “Ready to Burn?” form. Click Next

Identify Feed Source

If your Blog provides both RSS 2.0 and Atom 0.3 feeds, then you can select one of the options here. You might see choices such as

http://bloggerhelped.blogspot.com/feeds/posts/default

My suggestion, choose the RSS 2.0 feed which could be yoursite.com/feed

Give your feed its title and feedburner.com address

On “Welcome”, make sure the title and FeedBurner address (URI) of your new feed are values you prefer.

create a FeedBurner account by picking a username and password and supplying your email address.
click Activate Feed ». A "Congrats" page should appear.
then click Next » to continue with the setup process.

Monday, March 8, 2010

How to Add "Read More..."Posts link in Blogger

1. Login to your Blogger account and go to Layout > Edit HTML (click Expand Widget Template).

2. Find this line of code:

<data:post.body/>

3. Copy this code just before the code above:

<b:if cond='data:blog.pageType == "item"'>
<style>.fullpost{display:inline;}</style>
<p><data:post.body/></p>
<b:else/>
<style>.fullpost{display:none;}</style>


4. Now, copy this code just after the code above <data:post.body/>

<b:if cond='data:blog.pageType != "item"'><br />
<a expr:href='data:post.url'>Read more...</a>
</b:if>
</b:if>

Change the Read more... text to whatever link text you want to appear. The result should look something like this now:
5. Save your template.

Adding Class Tag in Your Default Post Template:
1. In your Blogger Dashboard, go to Settings > Formatting and scroll all the way down to the bottom. Copy this code and then save settings:

<span class="fullpost">

</span>


It should look something like this:

Creating a New Post:

When you click the Posting tab (HTML mode), you'll notice that your default post template now has <span class="fullpost"> and </span> tags. Anything you put above the tag <span class="fullpost"> will be the teaser text. The main body of your post needs to go in between the <span class="fullpost"> and </span> tags in order for the “read more…” link to work properly. See image below:


Publish or preview your new post to see your newly created "Read More..." works on your blog.

Friday, March 5, 2010

Insert HTML Code to Blogger Posting

If you enter any Java Script or HTML code in your posts, Blogger will automatically execute that code considering it a regular part of your post. We just need to encode our HTML special characters like <, >, & into entities <, >, &. This is a really painful process but Beta Templates is here to help you.
But how if the code is to much??? You can use this site to help change characteristic into notation. (http://centricle.com/tools/html-entities/). The way is so simple. Put your code and then click uncode.


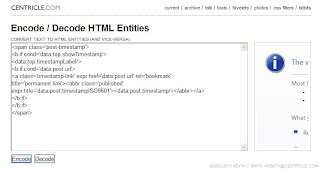
Click The Encode Button Than it look like the Below Image.
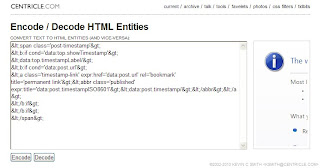
Post the Html code in the Post area,and Publish Post